Genuine Bearings for Planned Outage Inspection & Cleaning – Wholesale Supplier
Master Bearing cleaning and inspection during planned outages to reveal hidden subsurface fatigue and prevent catastrophic downtime. Learn safe solvent techniques that protect precision raceways, identify early failure signs like micro-pitting, and verify authenticity to ensure only genuine replacements enter your machinery.
 Written by
author
- Published on
- 7 min read
- Updated
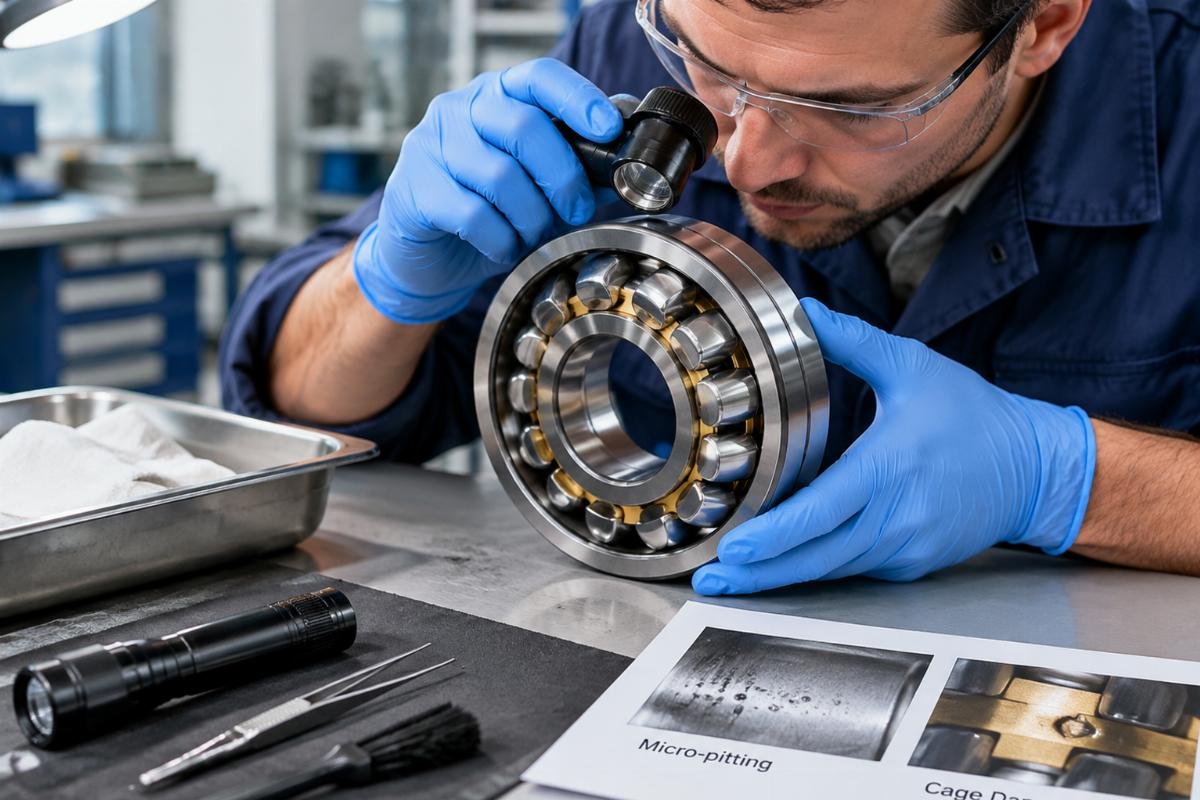
Genuine Bearings for Planned Outage Inspection & Cleaning – Wholesale Supplier
A shiny bearing surface is often a lie.
Systematic cleaning and inspection during planned outages identify early failures, preventing catastrophic downtime and ensuring only genuine replacements are installed. This process requires removing old grease to reveal subsurface fatigue, using gentle solvent techniques to protect raceways, and verifying traceability documents to avoid counterfeit parts.
I still remember the smell of burnt grease in that Foshan ceramic plant. The main drive had seized, halting the entire kiln line. When we finally cracked open the housing, the cage wasn’t just worn; it was shattered into debris scattered through the thick, black lubricant. The customer had sourced a batch of bearings from an unverified supplier to cut costs. What looked like a minor maintenance issue turned into four days of non-planned downtime. That incident shifted my perspective entirely. I stopped looking at bearings as simple commodities and started treating them as critical precision components where authenticity dictates survival. In the field, you learn quickly that the condition of the lubricant tells you more about the bearing’s history than the metal itself. [NEED_CITE: relationship between lubricant contamination and bearing failure modes]
The difference between a routine swap and a disaster often lies in the preparation. Many maintenance teams rush the cleaning phase, assuming that if the part looks clean, it is ready for reassembly or disposal. This assumption is dangerous. Proper Bearing cleaning and inspection is not just about hygiene; it is a diagnostic procedure. It reveals the hidden stories of load distribution, alignment issues, and material fatigue that are otherwise masked by grime. For MRO managers and maintenance engineers, mastering this protocol is the first line of defense against unplanned shutdowns.
Why is Pre-Cleaning Crucial Before Inspection?
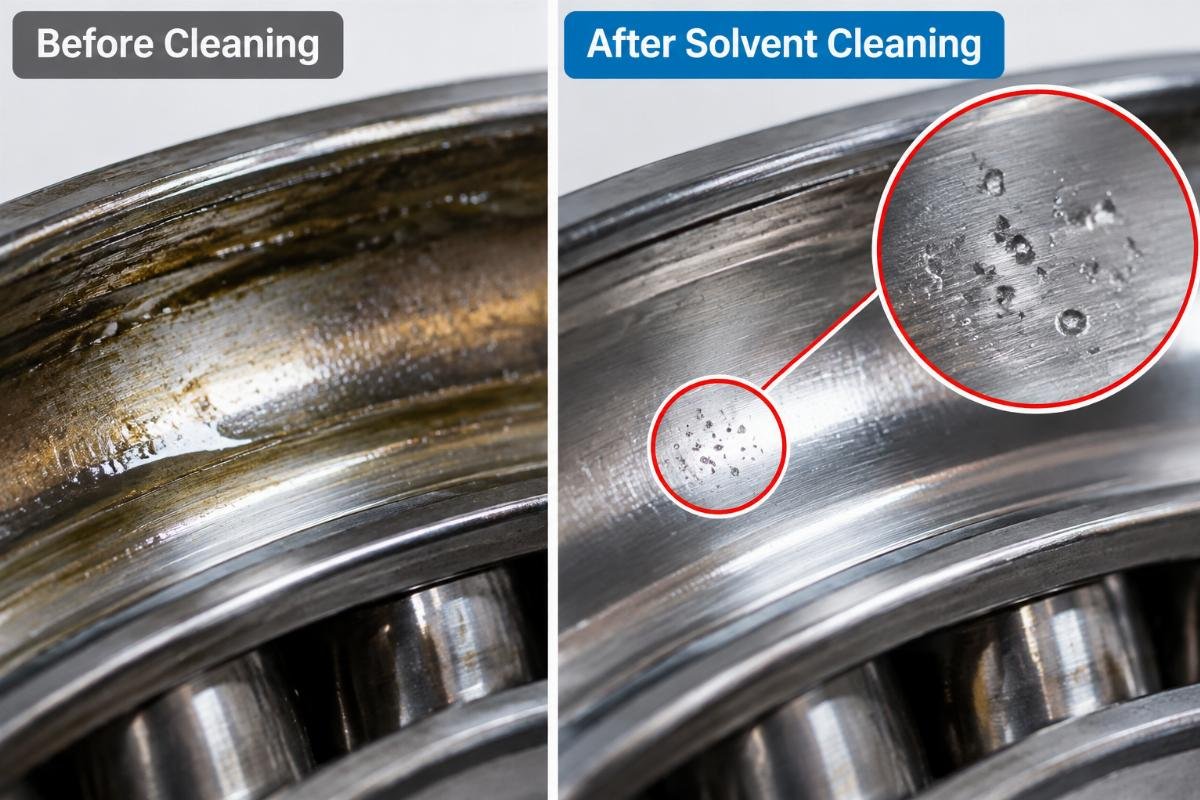
Removing old grease is the only way to see the true condition of the rolling elements.
Most technicians believe that a visual check of the outer surface is sufficient. They wipe away the excess sludge, see a polished steel surface, and declare the bearing good. This is a critical error. The real damage often occurs beneath the surface or in areas protected by thick grease layers. Subsurface fatigue, early-stage spalling, and microscopic cracks are invisible until the contaminant layer is completely removed. [NEED_CITE: ISO 15243 failure classification standards]
Grease acts as a mask. It traps wear particles, moisture, and chemical byproducts that can accelerate corrosion. If you inspect a bearing without thoroughly removing this medium, you risk misdiagnosing a failing component as healthy. In one case involving a mining crusher, a routine wash revealed micro-pitting on the rollers that was completely hidden under the old lubricant. Because the team took the time to strip the grease properly, they detected the issue early and scheduled a replacement during the next planned window, avoiding a catastrophic failure during peak production.
The cleaning process also prepares the surface for accurate measurement. Residual grease can interfere with dial indicators and micrometers, leading to false readings of clearance and runout. By establishing a clean baseline, you ensure that any dimensional deviations you measure are real, not artifacts of dirt. This step is non-negotiable for any serious reliability program. It transforms a guess into a data-driven decision.
What Are the Safe Cleaning Steps for Bearings?
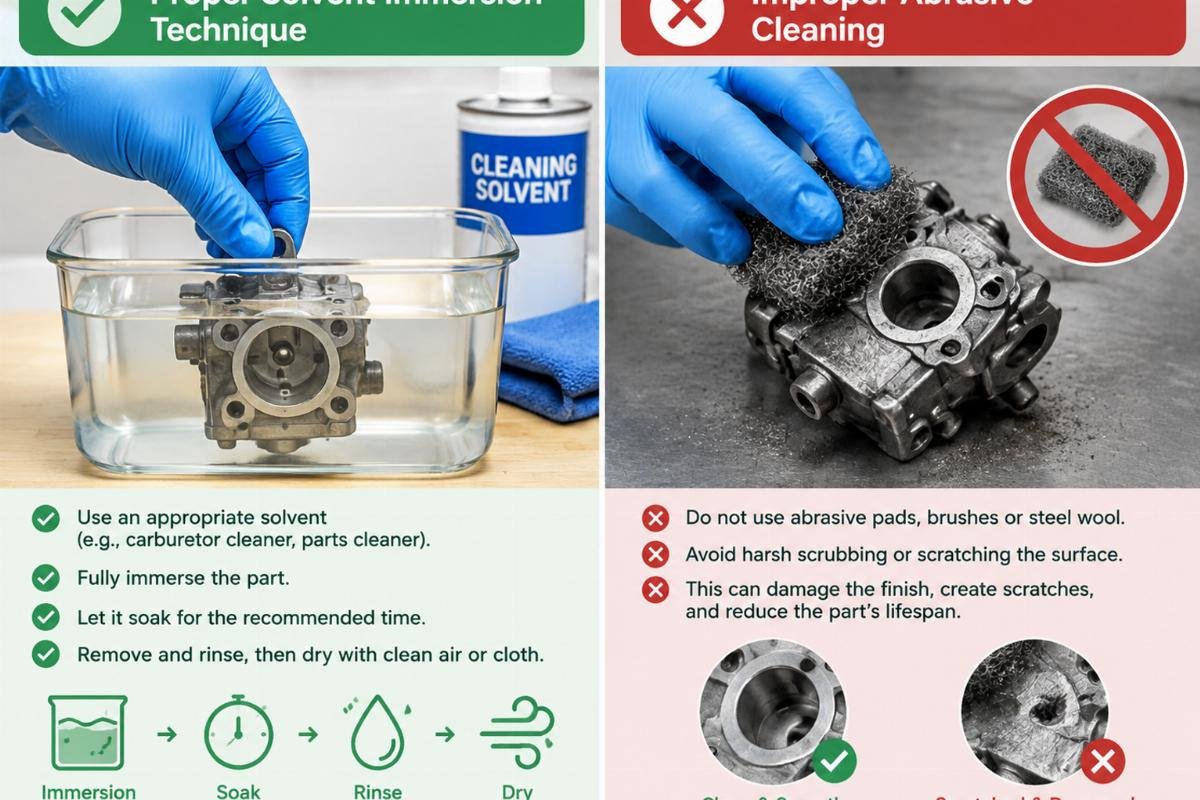
Aggressive scrubbing damages precision raceways; gentle solvent immersion is the correct method.
There is a common misconception that thorough mechanical scrubbing ensures a clean bearing. In reality, using wire brushes or abrasive pads on precision surfaces introduces micro-scratches that become initiation points for future fatigue cracks. The goal of Bearing cleaning and inspection is to remove contaminants without altering the surface integrity of the steel. [NEED_CITE: bearing manufacturer technical manuals on handling procedures]
The safe approach involves a two-stage solvent process. First, immerse the bearing in a coarse solvent to dissolve the bulk of the old grease and remove large particles. Use a soft brush or a wooden stick to gently dislodge debris from the cage pockets and roller gaps. Never rotate the bearing under load during this phase, as hard particles trapped between the rollers and raceways can cause indentations.
Second, move the bearing to a fine, clean solvent for a final rinse. This step removes the residual film from the first wash. Allow the bearing to air dry in a dust-free environment or use compressed air carefully, ensuring the nozzle does not spin the bearing at high speeds. Spinning a wet bearing with compressed air can damage the seals and force contaminants into the shielded areas.
| Cleaning Method | Risk Level | Surface Impact | Recommended Use |
|---|---|---|---|
| Wire Brush Scrubbing | High | Micro-scratches on raceways | Never on precision surfaces |
| High-Pressure Air Spin | Medium | Seal damage, contamination ingress | Drying only, low pressure |
| Solvent Immersion | Low | No surface alteration | Standard for all inspections |
| Ultrasonic Cleaning | Low-Medium | Potential cage resonance damage | Small bearings only, with caution |
This methodology protects the micron-level precision of the components. Whether you are dealing with deep-groove ball bearings or large spherical roller bearings, the principle remains the same: let the chemistry do the work, not the mechanics. Rushing this step compromises the entire inspection effort.
How to Identify Early Failure Signs During Inspection?
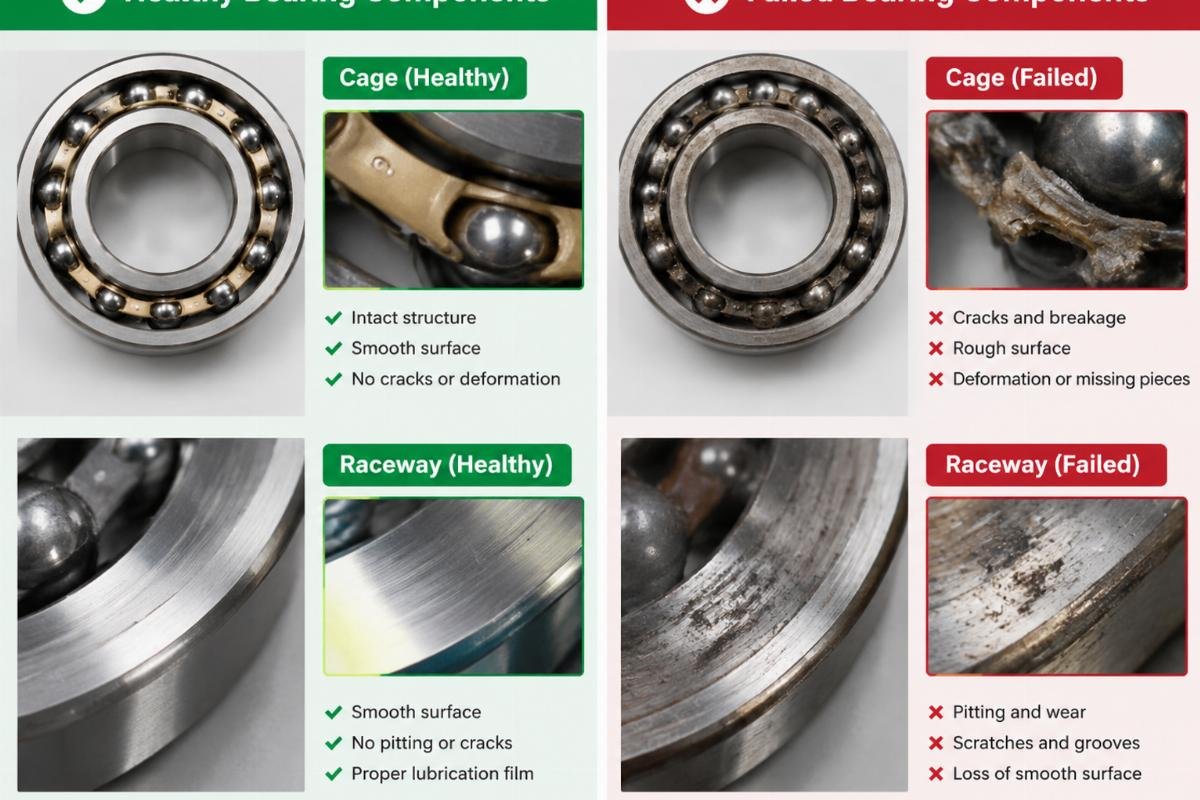
Checking for pitting, cage wear, and abnormal metal flakes predicts remaining useful life.
Once the bearing is clean, the real detective work begins. You are not just looking for broken parts; you are looking for patterns that indicate how the bearing was stressed. Early detection of these signs allows for planned replacement rather than emergency repair. [NEED_CITE: vibration baseline trending correlation with visual defects]
Start with the rolling elements. Look for micro-pitting or frosting, which appears as a dull, matte finish on the previously shiny steel. This indicates surface distress due to inadequate lubrication or overload. Next, examine the cage. A shattered cage, like the one I found in the ceramic kiln, is a clear sign of severe misalignment or excessive vibration. But even minor deformation or discoloration of the cage pockets can signal impending failure.
Pay close attention to the lubricant residue. If you find abnormal metal flakes or a grayish paste instead of clean oil, it suggests adhesive wear or false brinelling. In a steel mill conveyor application, we identified a fake bearing because the grease contained unusual metallic shards that did not match the expected wear pattern of the genuine article. Switching to traceable stock resolved the issue immediately.
| Failure Sign | Visual Indicator | Likely Cause | Action Required |
|---|---|---|---|
| Micro-pitting | Dull, matte patches on raceways | Lubrication breakdown | Replace and review lubrication plan |
| Cage Deformation | Bent or cracked cage bars | Vibration or misalignment | Check alignment and replace |
| Metal Flakes | Shiny particles in grease | Adhesive wear or counterfeit material | Investigate source and replace |
| Discoloration | Blue or brown tints on steel | Overheating | Check load and cooling systems |
These indicators are universal across brands like SKF, FAG, NSK, and TIMKEN. Recognizing them requires experience, but the consequences of ignoring them are always the same: unexpected downtime. Effective Bearing cleaning and inspection turns these subtle clues into actionable maintenance schedules.
How to Verify Bearing Authenticity Before Reinstallation?
Checking traceability documents and packaging prevents installing counterfeit parts that cause rapid failure.
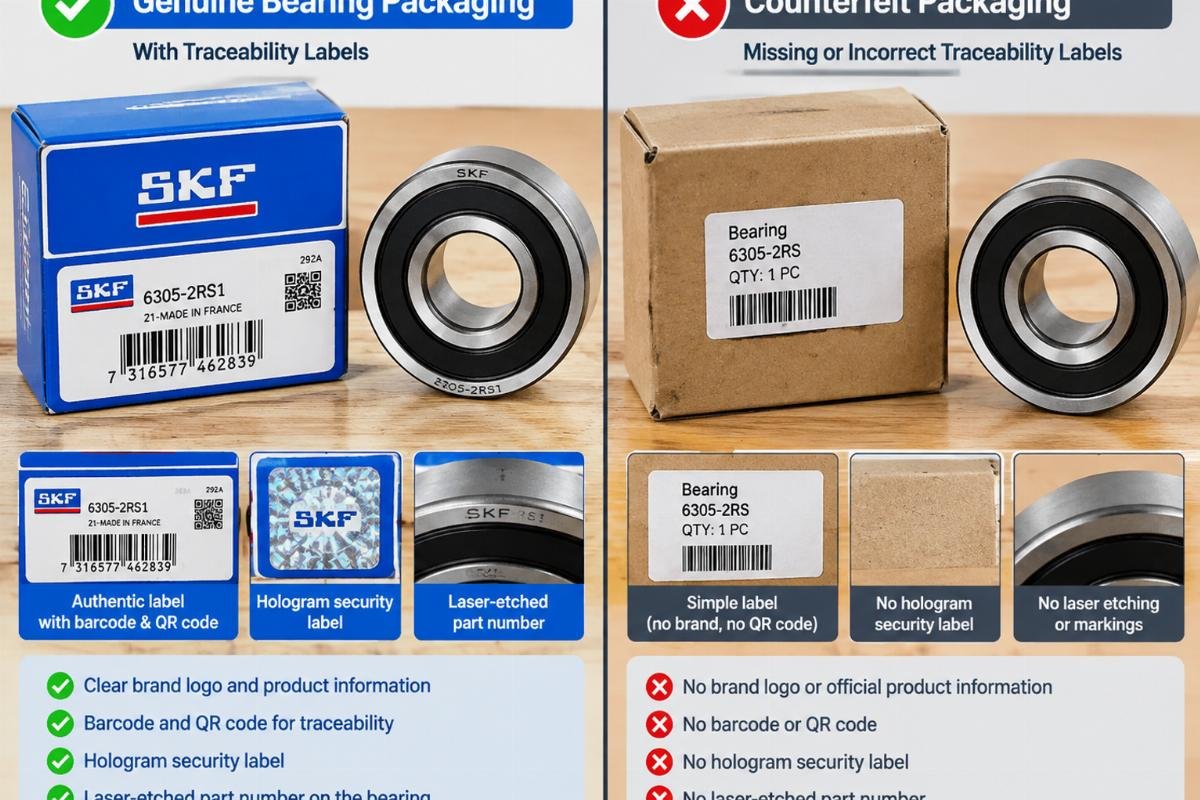
The final and perhaps most critical step is verifying that the bearing you are about to install is genuine. The market is flooded with counterfeits that look identical to the naked eye but fail under load due to inferior steel quality and poor heat treatment. Installing a fake bearing after a thorough inspection is a waste of time and money. [NEED_CITE: industry reports on counterfeit bearing prevalence in MRO]
Authenticity verification starts with the packaging. Genuine bearings from premium brands come with specific labeling, holograms, and batch codes that can be traced back to the manufacturer. Check the part number, brand logo, and country of origin for any inconsistencies in font or spacing. Counterfeiters often make small errors in these details.
More importantly, request traceability documentation. A reputable supplier will provide certificates of conformity and material test reports that link the specific batch of bearings to the manufacturer’s production records. In our global supply chain, we maintain strict control over these documents for every unit, from single emergency spares to full container loads. This level of transparency is rare but essential for high-risk applications.
If the bearing lacks proper documentation or the packaging looks tampered with, do not install it. The cost of a genuine bearing is negligible compared to the cost of a production halt. By integrating authenticity checks into your Bearing cleaning and inspection protocol, you ensure that only verified, high-quality components enter your machinery. This practice safeguards your equipment and validates your maintenance efforts.
Conclusion
Cleanliness reveals truth, but authenticity ensures longevity.
Systematic Bearing cleaning and inspection is not merely a maintenance task; it is a strategic tool for reliability. By removing grease carefully, identifying early failure signs, and verifying part authenticity, you transform planned outages from reactive chores into proactive safeguards. This approach minimizes unplanned downtime and ensures that every replacement part performs as intended. Trust the process, verify the source, and keep your machinery running.
Tags

About the author
author
Editor covering global sourcing, supplier verification, and industrial product knowledge. Content is compiled from manufacturer specifications, industry standards, and hands-on experience with international B2B buyers. Every article is fact-checked before publishing to help procurement professionals make informed decisions.
More articles by author

